The BIOS is the Basic Input/Output System. This is a chip which resides on the Motherboard within ROM (Read Only Memory) on older systems, or within some Flash memory on a more modern system. The BIOS is usually referred to as ‘firmware’. It contains instructions which allow the motherboard to initialize the hardware components and perform the POST (Power On Self Test), before moving forward to the boot process and loading the main operating system such as Windows or Linux.
Boot sequence is the order in which a computer searches for nonvolatile data storage devices containing program code to load the operating system (OS). Typically, a Macintosh system uses ROM and Windows uses BIOS to start the boot sequence. Once the instructions are found, the CPU takes control and loads the OS into system memory.
The devices that are usually listed as boot order options in the BIOS settings are hard disks, optical drives, flash drives, etc. The user is able to change the boot sequence via the CMOS setup. Boot sequence is also called as boot order or BIOS boot order.
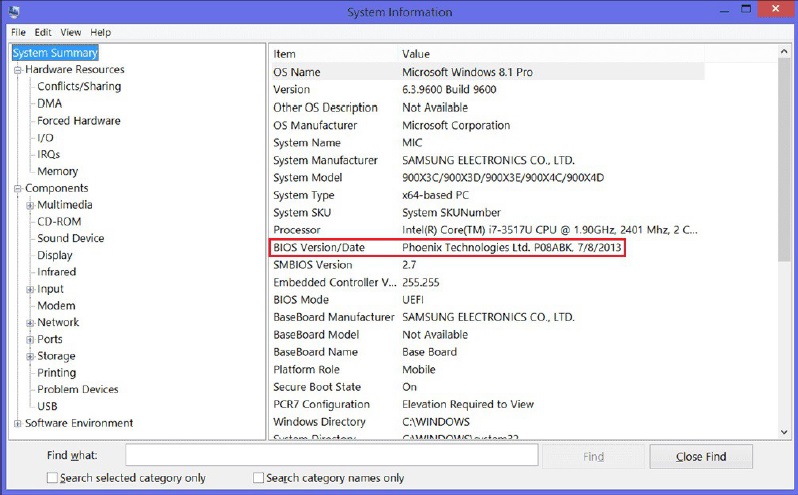
You may find the BIOS version on a Windows computer by running msinfo32 command at the command prompt. It will bring up the following window:

As can be seen in the above screenshot, BIOS info is given under System Summary.
BIOS has a Setup utility stored in the BIOS flash memory. The configured data is provided with context-sensitive Help and is stored in the system's battery-backed CMOS RAM. To get into the BIOS on your Windows computer you need to press F2 just after you turn on the computer. A typical BIOS snap shot is shown below:

The following are some of the things that you can do with BIOS settings:
Change the Boot Order
Create a BIOS Password
Change the Date and Time
Change Floppy Drive Settings
Change Hard Drive Settings
Change CD/DVD/BD Drive Settings
View Amount of Memory Installed
Enable or Disable the Quick Power On Self Test (POST)
Enable or Disable the CPU Internal Cache
Enable or Disable the Caching of BIOS
Change CPU Settings
Change Memory Settings
Change System Voltages
Enable or Disable RAID
Enable or Disable Onboard USB
Enable or Disable Onboard IEEE1394
Enable or Disable Onboard Audio
Enable or Disable Onboard Floppy Controller
Enable or Disable Onboard Serial/Parallel Ports
Enable or Disable ACPI
Change the Power Button Function
Change Power-on Settings
Change Fan Speed Settings
If the CMOS setup is not properly setup the computer may ignore or not look at the CD-ROM as a bootable option. Verify in the CMOS that your settings are properly set to boot from the CD-ROM drive.
Generally, these settings will be under the boot options. Setup your boot options similar to the below example.
Floppy / LS120
CD-ROM
Network (if available)
Hard Disk Drive
The best way to find the perfect resolution to suit you and your monitor is to experiment. To change the screen resolution, first right-click on the desktop and then left click on Screen resolution from the menu that appears. When using LCD/LED monitors, it is recommended to set for the native resolution of the monitor for best performance.

Usually, a sector contains 512 bytes. To find out the size of a hard disk, use the formula: (# of cylinders X # of sectors X # of heads) X 0.5 KB
To obtain BIOS string ID:
Power off the system
Either unplug your keyboard or hold down one of the keys on the keyboard
Power-on the system and you should get a keyboard error
The string in the lower left hand corner of your computer screen represents the BIOS String ID.
It is also possible to read the BIOS information by going to the BIOS set-up of the PC by pressing appropriate key (usually Del key) during boot up.
The general errors and the corresponding failures are shown below:
100-199: System board failures 200-299: Memory failures
300-399: Key board failures
400-499: Monochrome video problems 500-599: Color video problems
600-699: Floppy disk errors 1700-1799: Hard disk problems.
It is most likely that the USB is not enabled in the BIOS. This is the first thing to be checked while configuring USB port. If the keyboard is USB keyboard, and you are unable to enter BIOS configuration, it may need to be replaced with a conventional keyboard for the purpose of changing/ verifying the BIOS settings. Note that USB interface need to be enabled in the BIOS

