POST (Power On Self Test): It is a vital part of PC boot process. The first thing that BIOS does is to call POST for inspecting various parts of your PC hardware before actual BIOS boot process starts. POST continues even after the BIOS boot process is started, checking various parts of the PC such as memory as it boots.
BIOS/POST (Power On Self Test) produces audio beep codes and/or video message indicating the boot status. Less known is the fact that BIOS of most PCs also send out diagnostic test codes to a specified memory location. By using a special card, called BIOS POST Diagnostic card, it is possible to diagnose the exact nature, and location of the fault. These cards come with an LED display that displays the codes. The POST Diagnostic cards usually work with either ISA, EISA OR PCI.
There are several error codes that are built into POST. Some of these are:
1. CMOS memory size mismatch - This error indicates that the stored memory size value is not matching what is measured currently. If this error occurs during first boot or after memory up gradation, just ignore this error. However, if this error occurs repeatedly, there might be some problem.
Note that there are no POST error codes such as Hard disk data read error or Network card failure. It is important to go through the process of POST and BIOS boot sequence and observe various events.
2. Wake-On-LAN facilitates server maintenance remotely. If you find any problem with connecting to a remote server, it is likely that the operating system has not detected the network card properly. Therefore, it is recommended to install appropriate driver that was supplied by the vendor along with the card.
Improper shutdown: Some problems may arise due to improper shutdown. User appropriate shutdown command.
1. Windows 2008/2012: Issue shutdown /s command at the command prompt. Various other options are also available.
2. Unix/ Linux: There are various options and versions. Generally "Shutdown now" will start the shutdown process. In addition, you can add -r option to the command to make the system to reboot after shutdown.
Sever Assembly checklist:
The following precautions need to be taken before the actual assembly process:
1. Wear antistatic wrist or foot strap
2. Use antistatic mat
3. Ensure proper grounding of the anti-static workstation (The workstation includes an anti-static wrist/foot strap, anti-static mats).
4. Avoid material such as carpeted floors, packing foam, wool, and plastic.
5. Avoid holding the cards by their finger contacts. Always hold the cards by their edges or rails.
6. DO NOT remove the cards from their anti-static bags unless they are ready to be assembled. Remove the card from the anti-static bag only when you are assembling it.
7. Ensure that the power is switched off and the power cord is taken out of the mains.
Server Hardening:
It is recommended to disable unused ports in a server computer as part of hardware and software hardening. Two ways that you could disable USB ports are:
1. By using Device Manager
2. By using BIOS
1. By using Device Manager: The Device Manager may be opened in several way as mentioned below:
You can open Device Manager in any of the following ways:
Once you are in the Device Manager, you can right click the USB Controller, and select Disable. This will disable the device.
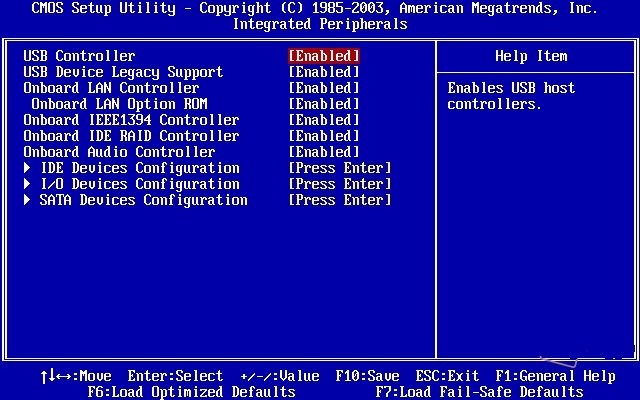
2. By Using BIOS: This is another way to disable USB ports on a computer. Just go to the BIOS setup while starting the computer, and disable the USB ports. Note that you had set the BIOS password prior to making any hardening using BIOS. A sample display is shown below:

You can set the USB controller to Disabled state using toggle key.
Note that WOL, short for Wake On LAN is used to start a computer remotely without being physically present at the computer itself. For server computers, it is recommended to disable WOL for security reasons.
Generally, the following precautions need to be taken when upgrading or troubleshooting memory:
1. Ensure that the memory modules are seated properly: Make sure the notches in your module are lined up with the keys in the slot, then press down. You may need to apply a lot of pressure to properly "seat" the module. If installed properly, the clips on the side of module should snap into place on their own.
2. Update your BIOS: If your computer is older, it may need a BIOS (Basic Input Output System) update in order to work with today's technology. To update your BIOS, contact your system or motherboard manufacturer and they'll direct you to where you can download the software and provide update instructions.
3. Use same type of memory: Make sure that your new memory is the same type as your old memory (i.e. FPM/EDO/SDRAM, parity/non-parity/ECC, buffered/unbuffered).
4. Fill your slots starting with the largest density and working to the smallest (put the largest module in slot 0, and the second largest in slot 1, and so on). Some systems go in reverse order, so if this doesn't work, try reversing the procedure.
5. Memory mismatch error: If you get a memory mismatch error follow the prompts to enter setup, then select save and exit. (This is not an error - some systems must do this to update their CMOS settings.)

When an additional memory is installed, it is usual to get an error during initial start-up that the memory is incorrect. Just enter the BIOS and specify that the new memory value is correct.
Upgrading Server:
Generally, the following Server components may have the BIOS of their own, which need to be considered during any upgrade to the Server.
The actual firmware upgrade takes only a few minutes. However, planning the upgrade and obtaining the suitable firmware upgrade and preparing a checklist of activities may take much longer.
1. SCSI adapters
2. RAID Controllers
3. Video cards
4. Mother boards
Note that, some times a network card may misbehave and produce higher than normal interrupts causing process problems. If this were the case, the processor utilization would be low and can be identified poor processor utilization.
It is often required that the system BIOS may need to be upgraded for adding a second processor. One need to check with the documentation and the vendors web site for details before going ahead with the up gradation.
Now that there are several command options available to you to restore the server to the working state.
a) The most useful option is just to scan the whole system immediately, which will scan and attempt to repair any files that are changed or corrupted. You can do that with this command: :sfc /scannow
Alternatively, you can use the command sfc /verifyonly to scan for problems, but not perform any repairs.
b) To troubleshoot and repair for the following items
A master boot record (MBR)
A boot sector
A Boot Configuration Data (BCD) store
use the BOOTREC command with appropriate option as described below:
To rebuild the boot configuration data (BCD), execute the following command: BOOTREC /REBUILDBCD
To repair the Master Boot record, execute the following command: BOOTREC /FIXMBR
To repair the boot sector, execute the following command: BOOTREC /FIXBOOT
Finally, to apply the master boot code that is compatible with BOOTMGR, execute the following command, where Drive is the drive where the installation media resides:Drive:\boot\Bootsect.exe /NT60
Note that you may need to apply one or more commands to repair the OS as necessary.
Boot loader: Boot loader is the first program, that runs, when a computer is switched on. It later transfers control to an operating system kernel. GRUB (GRand Unified Boot loader) is the default boot loader for many Linux distributions, including Ubantu. Grub (latest GRUB-2) typically gets over ridden when you install Windows or another Operating System. To make Ubuntu control the boot process, you need to reinstall (Repair/Restore) Grub using a Ubuntu Live CD.
Typical steps involved this process are given below:
1. Mount the partition your Ubuntu Installation is on.
2. Bind the directories that grub needs access to to detect other operating systems.
3. Now we jump into that using chroot.
4. Now install, check, and update grub.
This time you only need to add the drive letter (usually a) to replace X, for example: grub-install /dev/sda, grub-install - recheck /dev/sda.
The command used for this purpose are:
grub-install /dev/sdX
grub-install --recheck /dev/sdX
update-grub
5. Now grub is back, you can exit the chrooted system and unmount everything.
6. Shut down and turn your computer back on, and you will be met with the default Grub2 screen.
The best place to verify compatibility is manufacturers Web site. The necessary drivers can be down-loaded from respective vendor sites. It is important to take a back-up before proceeding with the up gradation.
UNIX/Linux is usually administered by writing scripts and through configuration files. Other operating systems like Windows NT and Netware are GUI based and relatively easy to administer.
Normally, continued hum is associated with moving parts. The components susceptible for this kind of a problem are fan, hard drive, and floppy disk. Since a network card or any other PCA (printed circuit assembly) consist of only ICs, it is not likely to be the source of the noise.
The most effective way of knowing any disk drive failures is to configure remote notification on the server.
Surge Protector: A surge protector (or surge suppressor) is an appliance designed to protect electrical devices from voltage spikes. A surge suppressor attempts to limit the voltage supplied to an electric device by either blocking or by shorting to ground any unwanted voltages above a safe threshold.

