1. Headend VPN device: It is located at the head quarters, and serves as primary VPN device.
2. VPN access device: It is located at the remote end (of a teleworkers or a branch office) and works as remote end VPN access device.
3. VPN tunnel: It is logical pipe through which the data flows from one end of the VPN tunnel to the other end.
4. Broadband service: Of course, it the service normally provided by the ISP over which an organization or a teleworkers accesses the Internet.
IPSEC:
The two primary security services that are provided by IPSec are:
1. Authentication Header (AH), and
2. Encapsulating Security Payload
Given below are the important protocols or suite of protocols used frequently with IPSec:
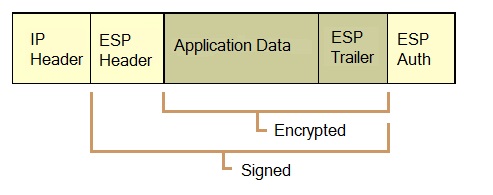
ESP: Encapsulating Security Payload (ESP) provides confidentiality, in addition to authentication, integrity, and anti-replay. ESP can be used alone, or in combination with AH. ESP uses HMAC-MD5 and HMAC-SHA algorithms to provide authentication functions. VPN uses Data Encryption Standard (DES), triple-DES (3DES), RC5, RC4, or Advanced Encryption Standard (AES) for encryption
The figure below shows the ESP packet. As shown in the figure, the following fields are encrypted:
1. Application Data
2. ESP Trailer consisting of a) Padding, b) Padding Length, and c) Next Header fields.

The following fields are signed for data integrity, but not encrypted:
1. ESP Header
2. ESP Authentication
Note that IP Header field is neither signed nor encrypted.
AH: Authentication Header (AH) provides authentication, integrity, and anti-replay for the entire packet (both the IP header and the data payload carried in the packet). It does not provide confidentiality, which means it does not encrypt the data. The data is readable, but protected from modification. AH uses the HMAC algorithms. HMAC Authentication. It provides the authentication of the sender, and ESP provides encryption of the payload
Hash-based message authentication code (HMAC): HMAC is a mechanism for calculating a message authentication code involving a hash function in combination with a secret key. This can be used to verify the integrity and authenticity of a message.
Other hash based algorithms include DES, triple DES, and AES.
Diffie-Hellman (DH) can be used to dynamically generate symmetrical keys to be used by symmetrical algorithms.
The proper order for creating IPSEC tunnel (Phase 2) that is usually followed is given below:
1. Create extended ACL: create an access-list and define the traffic we would like the router to pass through the VPN tunnel
Example:
In this example, it would be traffic from one network to the other, 10.10.10.0/24 to 20.20.20.0/24. Access-lists that define VPN traffic are sometimes called crypto access-list or interesting traffic access-list.
R1(config)# ip access-list extended
VPN-TRAFFIC
R1(config-ext-nacl)# permit ip
10.10.10.0 0.0.0.255 20.20.20.0 0.0.0.255
2. Create IPSec Transform: Next step is to create the transform set used to protect our data.
Example:
R1(config)#crypto ipsec transform-set TSET esp-3des esp-md5-hmac
The above command defines the following:
ESP-3DES - Encryption method
MD5 - Hashing algorithm
TSET is the transform set we have created
3. Create Crypto Map:
The Crypto map is the last step of our setup and connects the ISAKMP (defined in Phase 1) and IPSec configuration (Phase 2) together:
R1(config)# crypto map CMAP
10 ipsec-isakmp
R1(config-crypto-map)# set peer
2.2.2.2
R1(config-crypto-map)# set transform-set
TSET
R1(config-crypto-map)# match address
VPN-TRAFFIC
We've named our crypto map CMAP. The ipsec-isakmp tag tells the router that this crypto map is an IPsec crypto map. Although there is only one peer declared in this crypto map (2.2.2.2), it is possible to have multiple peers within a given crypto map
4. Apply crypto map to the public interface: The final step is to apply the crypto map to the outgoing interface of the router.
Here, the outgoing interface is FastEthernet 0/1.
R1(config)# interface FastEthernet0/1
R1(config- if)# crypto map
CMAP
Note that you can assign only one crypto map to an interface.
As soon as we apply crypto map on the interface, we receive a message from the router that confirms isakmp is on: "ISAKMP is ON".
At this point, we have completed the IPSec VPN configuration on the Site 1 router.
Verifying IPSEC VPN:
1. show crypto isakmp sa detail - See the details for the IKE Phase 1 tunnel that is in place
2. show crypto ipsec sa detail - See the details for the IKE Phase 2 tunnels that are in place. There is one inbound Security Association (SA) and one outbound. They both have different SA numbers used for tracking these sessions.
3. show crypto engine connections active - Command provides stats to verify if the encryption and decryption is working.
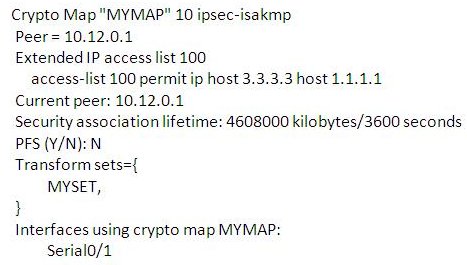
4. show crypto map - Provides the details of the crypto map, and where it is applied, showing the contents of the IKE Phase 2 transform sets, the current peer and other information.
Once you configure PKI, it is necessary to verify whether all the policies are in place. You can issue the command show crypto isakmp policy for this purpose. This command has no arguments.
The following is sample output from the show crypto isakmp policy command, after two IKE policies have been configured (with priorities 15 and 20, respectively):
The command shows the map name, peer ip address, Extended Access List, Security Association life time, List of transform sets, whether PFS is used or not. This show command is very useful in finding bugs with the VPN configuration. Typical output is as given below:

show crypto ipsec sa command shows IPsec Security Associations (SAs) built between peers.
This output shows an example of the show crypto ipsec sa command.
interface : FastEthernet0
Crypto map tag: test, local addr. 14.1.1.1
local ident (addr/mask/prot/port) : (20.2.1.0/255.255.255.0/0/0)
remote ident (addr/mask/prot/port) : (10.2.1.0/255.255.255.0/0/0)
current_peer: 14.1.1.2
PERMIT, flags={origin_is_acl,}
#pkts encaps: 8867918, #pkts encrypt : 8867918, #pkts digest 8867918
#pkts decaps: 8860382, #pkts decrypt : 8860382, #pkts verify 8860382
#pkts compressed: 0, #pkts decompressed : 0
#pkts not compressed: 0, #pkts compr. failed: 0,
#pkts decompress failed: 0, #send errors 1, #recv errors 0
local crypto endpt.: 14.1.1.1, remote crypto endpt. : 14.1.1.2
path mtu 1500, media mtu 1500
<less relevant output omitted>
The encrypted tunnel is built between 14.1.1.1 and 14.1.1.2 for traffic that goes between networks 20.2.1.0 and 10.2.1.0. You can see the two Encapsulating Security Payload (ESP) SAs built inbound and outbound.
show crypto map - Displays which components are included in the crypto map, including the ACL, the peer address, the transform set, and where the crypto map is applied.
show crypto ipsec sa - Shows whether the IPSec tunnel is operational. The IPsec or IKE Phase 2 consists of two uni-directional tunnels. There is one in forward direction and the other in the reverse direction. They have different SPIs (Security Parameter Indexes), but together, these two uni-directional tunnels make up the "IPsec" tunnel.
show crypto isakmp sa - See the details for the IKE Phase 2 tunnels that are in place.show crypto engine connection active
Site-to-Site VPN tunnels is established in 2 phases
Phase 1 negotiations include these steps:
A. The devices exchange credentials: The credentials can be a certificate or a pre-shared key. Both gateway endpoints must use the same credential method. If one peer uses a pre-shared key, the other peer must also use a pre-shared key, and the keys must match. If one peer uses a certificate, the other peer must also use a certificate.
B. The devices identify each other: Each device provides a Phase 1 identifier, which can be an IP address, domain name, domain information, or an X500 name. The VPN configuration on each peer contains the Phase 1 identifier of the local and the remote device, and the configurations must match.
C. The peers decide whether to use Main Mode or Aggressive Mode.
Phase 1 negotiations can use one of two different modes: Main Mode or Aggressive Mode. The device that starts the IKE negotiations (the initiator) sends either a Main Mode proposal or an Aggressive Mode proposal. The responder can reject the proposal if it is not configured to use that mode. Aggressive Mode is less secured but faster than Main Mode.
When you use Aggressive mode, the number of exchanges between two endpoints is fewer than it would be if you used Main Mode, and the exchange relies mainly on the ID types used in the exchange by both appliances. Aggressive Mode does not ensure the identity of the peer. Main Mode ensures the identity of both peers, but can only be used if both sides have a static IP address.
D. The peers agree on Phase 1 parameters.
Whether to use NAT traversal
Whether to send IKE keep-alive messages
E. The peers agree on Phase 1 Transform settings.
Transform settings include a set of authentication and encryption parameters and the maximum amount of time for the Phase 1 SA. The settings in the Phase 1 transform must exactly match a Phase 1 transform on the IKE peer, or IKE negotiations fail.
The items you can set in the transform are:
1. Authentication: The type of authentication (SHA1 or MD5).
2. Encryption: The type of encryption algorithm (DES, 3DES or AES).
3. SA Life: The amount of time until the Phase 1 Security Association expires.
4. Key Group: The Diffie-Hellman key group

3DES, RC4 are legacy encryption schemes, and it is recommended to replace the same with AES.
MD5 is an older integrity check algorithm, and it is recommended to replace the same with SHA-256 or better.
SHA-256, SHA-384, and SHA-512 are next gen algorithms for integrity check.

