Display Settings:The display setting can be changed in two ways:
1. Start -> Settings -> Control Panel -> Display
2. Right click Desktop -> Properties -> Setting
There are two ways in which you can change the display resolution:
1. Start -> Control Panel -> Display
2. First right-click on the desktop and then left click on Properties from the menu that appears.
The best way to find the perfect resolution to suit you and your monitor is to experiment. To change the screen resolution, first right-click on the desktop and then left click on Screen resolution from the menu that appears. When using LCD/LED monitors, it is recommended to set for the native resolution of the monitor for best performance.
You can configure support for multiple displays on your Windows 7 computer. To configure multiple displays on Windows 7
Click "Start" button -> Control Panel -> Appearance and Personalization -> Personalization ->Display Settings
1. Programs and Features is the place to go in the Control Panel (CP) to remove an application in Windows 7/Vista.
2. Folder Options is where you can go to change how folders are displayed
3. Administrator Tools is a group of tools such as Computer Management and the Task Scheduler.
4. It is known as Add/Remove Programs in Windows XP.
When the screen resolution is set to very low, then the text size becomes larger, and sometimes it may result in some portions of the text not viewable. Set the screen resolution properly using the properties window. Refresh rate results in screen flickering (if the refresh rate is too low), and nothing to do with resolution.
You can enable memory dump to a file when your system is about to crash due to Stop Error (such as Blue Screen)
The following types of memory dumps are available with Windows 8.
1. Complete memory dump: A complete memory dump is the largest type of possible memory dump. This contains a copy of all the data used by Windows in physical memory.
2. Kernel memory dump
3. Small memory dump (256 KB): It contains the blue-screen information, a list of loaded drivers, process information, and a bit of kernel information. It can be helpful for identifying the error,
4. Automatic memory dump: This is the default option, and it contains the exact same information as a kernel memory dump.
You can open Windows Update in any of the following ways to check for latest help files or updated drivers:
1. Click Start | Control Panel | System and Security | Windows Update
2. Click Start | Control Panel | Windows Update
3. Type "Windows Update" on Start menu Search
4. Right-click Action Center | Open Windows Update on the notification area
5. After opening Windows Update, click "Check for updates" on the left pane

Windows 7 provides Windows Update through Control Panel > Windows Update. However, Windows 8 and Windows 8.1 provide access to Windows Update app through both Control Panel and PC Settings app. In Windows 10, to access Windows update feature, select the Start button, select Settings > Update and security > Windows Update.
View Hidden files:On your Windows 7 computer, you can use the View tab in Folder Options of Appearance and Personalization applet in the Control Panel to show / hidden files and folders that have "Hidden" attribute set. You can also use Windows Explorer -> Organize -> Folder and Search Options -> View tab.
Power Options:
Sleep mode is a power-saving state that is similar to pausing a DVD movie. All actions on the computer are stopped and any open documents and applications are put in memory. You can quickly resume normal, full-power operation within a few seconds. Sleep mode is basically the same thing as "Standby" mode. The Sleep mode is useful if you want to stop working for a short period of time. The computer doesn't use much power in Sleep mode. In Sleep mode, any open documents and applications are put in memory while the computer goes into a low-power state. The computer technically stays on, but only uses a smaller of power, and the LED screen will also be off. You can quickly resume normal, full-power operation within a few seconds. Sleep mode is basically the same thing as "Standby" mode. Sleep mode is useful if you want to stop working for a short period of time.
Hibernate mode: Saves your open documents and running applications to your hard disk and shuts down the computer, which means once your computer is in Hibernate mode, it uses zero power. Once the computer is powered back on, it will resume everything where you left off. Use this mode if you won't be using the laptop for an extended period of time, and you don't want to close your documents. Hibernate mode is very similar to sleep, but instead of saving your open documents and running applications to your RAM, it saves them to your hard disk. In other words, Hibernation mode stores the current session on to the hard disk, and resumes the current session when the computer is switched on. This allows your computer to turn off entirely, thus saving power.
Once the computer is powered back on, it will resume everything where you left off. This mode is useful if you don't want to close your documents when you are away for longer periods of time, and would like to continue where you had left off. Hibernate saves an image of your desktop, including all open windows and files. Then it powers down your computer just as if you had turned it off. When you turn your computer on again, your windows and files are open just as you left them.
Stand by: It is a mode the computer, monitor, or other device enters when idle for too long. This mode helps conserve power when a computer or computer device is not in use without having to sacrifice the time it would take to turn off and on the computer. When in Stand by, the computer or monitor has a solid or flashing amber light, indicating that there is still power but the computer is in Standby mode.
When you select Standby, the power to your screen, hard drive, and peripheral devices is cut. However, the power to the computer's memory (RAM) is maintained so your open files stay open. Shutdown basically shuts down your computer completely. If you are going to be away from your computer for an extended time or overnight, putting your system into hibernate mode puts your system into an even deeper sleep than Standby mode and is essentially just short of a complete shutdown.

In Windows 7, the Sleep and Hibernate options are accessed using the arrow button next to the Shut down button on the Start menu.
You can also change the amount of time before your computer goes into sleep or hibernate mode, or turn off each mode completely.
To configure any of the power options, you first have to go to Start, then Control Panel, and then click on Power Options.
In the Power Options properties dialog, there are six tabs: Power Schemes, Alarms, Power Meter, Advanced, and Hibernate.
In the Advanced tab you will be able to configure the action that would take place when the laptop lid is closed.
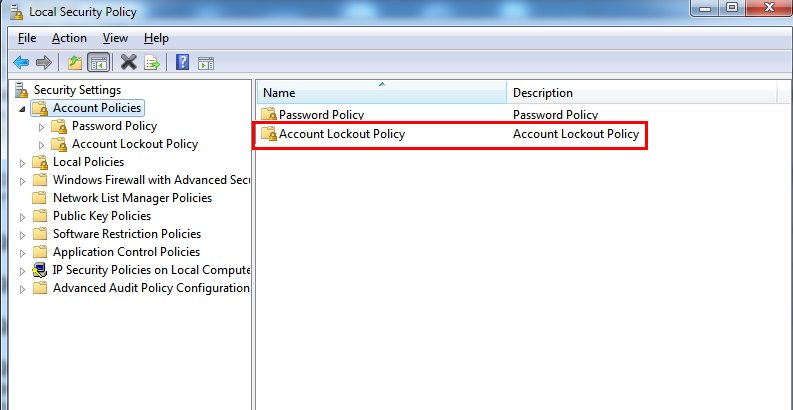
You can set the password policy using Local Security Policy option. Follow following steps to Open "Local Security Policy" :
1. Click the Start button and type secpol.msc into the Search box.
2. Click secpol [Note: Administrator permission required If you are prompted for an administrator password or confirmation, type the password or provide confirmation].
3. In the Navigation pane, double-click "Account Policies".
4. Click on "Password Policy" in right pane. - F
You can also go there using Administrative Tools option in Control Panel, then clicking on Local Security Policy option.
Changing account lockout policy
Open the Control Panel (icons view), and go to Administrative Tools.
1. In the right pane, double click on Local Security Policy to open it.
2. You can now set and manage the Local Security Policies on your computer as per your requirement.
Alternatively
1. Open the Start menu, and type secpol.msc in the search line and press Enter.
NOTE: This file is located at C:\Windows\System32\secpol.msc. (See screenshot below)
A POST test card is a small diagnostic tool that displays error codes generated during the Power On Self Test.

These errors, called POST codes, correspond directly to a test that has failed and can help determine what piece of hardware is causing an issue.
Most POST test cards plug directly into expansion slots in the motherboard while a few others connect externally via a parallel or serial port.
Also Known As: Power On Self Test card, POST card, POST diagnostic card, checkpoint card, port 80h card
You could go to Task Manager and click on "users" tab. All currently logged in users will be listed.
Color Depth:Given below are some commonly used color depths and the number of bits required to store the color information per pixel:
1 bit (mono) : 2 colors
2 bits: 4 colors
4 bits: 16 colors
8 bits: 256 colors
16 bits: 64K colors
24 bits: 16.7M colors
The following are the important characteristics of Windows HomeGroups:
1. HomeGroup computers connect to one another by a using a common password. You can access HomeGroup by going to Control Panel\Network and Internet\HomeGroup.
2. HomeGroup computers share Windows libraries but not the Folders by default. However, you may share any folder by browsing to the specific folder. To do this, right click on the folder, and select "Share with" as shown in the figure below:
3. HomeGroups are not available MAC OS X, Windows Vista, and Linux Distros.
4. You can connect Windows 7 and Windows 8 computers to share HomeGroups.

